Wednesday, October 28, 2015

EQ7 Tips & Tutorials - Part 2 of How to Import Fabrics into Your EQ7 Library


Yesterday I posted a tutorial about how where to find and download fabric images from the internet and how to organize them on your computer.  Today I am going to show you how to get those images into EQ7.

To import pictures from your computer into EQ7, follow these 4 steps:

Step 1 - Click on the "Libraries" tab and then "Fabric Library...".  This will bring up the Fabric Libraries window.


Step 2 - In the Fabric Libraries window, click on the "Import" button and select "From Image Files".  This will bring up the Import from Fabric Scans window.

Step 3 - Using your organized fabric files (more on how to organize them here), select the single image file you want and press Open or select an image file within a folder and then Ctrl-A (press Ctrl key and the A key at the same time) to select all of the files within the folder and press Open.


Step 4 - You will be brought back to the Fabric Libraries window and your fabrics you imported will show up on the right side of the window under the heading "Import Results".  (Don't stop here because your fabrics are not yet in your project).

Click on one of the fabric images within the Fabric Libraries window, press Ctrl-A again to select all of the fabric images and then click the "Add to Sketchbook" button.


Your fabric images will now show up in your Sketchbook Fabrics and Colors window (that pops up when you are coloring a block or quilt) at the end of the fabrics in the "Fabrics" tab.


And now you can play with your fabrics!

Bonus tip - If you have already imported fabrics into one EQ7 file and want to use them in another file, in Step 2 you can select "From Project" instead and all of the fabrics in that project (both EQ7 standards and your additional ones) will show up in the "Import Results" area.

Simply select the ones you want to import (holding the Ctrl key down clicking on the fabrics allows for you to select multiple images) and press the "Add to Sketchbook" button.

I hope you find these tutorials helpful!  Please e-mail me or leave a comment with any EQ topics you would like me to cover.


Tuesday, October 27, 2015

EQ7 Tips & Tutorials - Part 1 of How to Import Fabrics into Your EQ7 Library


One of my quilty friends Jayne asked a great question asking to get fabric images into your EQ7 library.  I started to write a tutorial for that and realized that it made sense to first show where to get fabric images.

So I broke the tutorial up into two parts, today I will be focusing on how to get fabric images onto your computer and tomorrow I will show you how to import them into EQ7.

Note:  As far as I can tell (and I am not a lawyer), the fabric images you find on the internet are for personal, home use only.  Not for commercial uses (like in printed pattern instructions, product packaging, websites, etc).

There are three main ways to get fabric images:
  1. Free from the internet
  2. Purchased from the internet
  3. Photographed from your own stash

1.  Free from the internet:

Pros:
  • Many of the fabric manufacturer's actually have places on their sites where you can download entire collections of fabric in a zip file (so you can download 20-40 fabric images at once).  
  • They are free :)
Cons:

Here is a bunch of places to find fabric images:

United Notions - Moda Fabrics - (Free) - The United Notions website contains almost 900 fabric collections and is constantly updated with the soon to be released and just released fabric.  Each collection is downloaded as a zip file.

Riley Blake - (Free) - For Riley Blake's fabric collection images, you need to select the fabric tab from the main menu, select the collection you wish to download, and then press the download images button.

Online Fabric Stores:  Some online fabric stores will allow you to download and use their fabric images provided you had purchased the fabric through them.


2.  Purchased Images from the Internet

Pros:
  • Easy install  
  • Fabric images are scaled correctly for EQ7
  • Quickest way to get tons of fabric images pretty inexpensively
Cons:
  • Not free
Electronic Quilt - ($7.95 for 1000+ images) - Electronic Quilt has many collections of fabric images for sale in categories such as Halloween prints, Batiks, and Fall 2015 releases.  I have never bought an image package from EQ, but I because EQ prepared it, most likely the images are more properly scaled than some other downloads.  (Note: I could not find out any information about use restrictions of the images on the EQ website.)


3.  Photographing Your Own Stash

Pros:
  • Free
  • You will have a indexed library of all of your fabrics 
Cons:
  • Time consuming
  • Colors and scale of fabrics may be off
Photographing your own stash is great because you can have your stash organized and ready to play with ion EQ whenever you want.  The downside is that this is the most time consuming and the colors and scale might not be correct.


Image Organization

Whichever method you use to acquire your fabric images, pretty soon you are going to have more files than you know what to do with on your computer.  I suggest that just as you organize your real fabrics you organize your online fabric image "stash" too.

On my computer I have a folder set up that is called "Fabric".  In that folder, I have have about 40 other folders, each with a collection name on them.  This way, if I am thinking that I want to play around with the new Bonnie and Camille fabric, I can go right to the "Hello Darling" folder for all of the images.  It takes just a few minutes to set everything up correctly to start with and it will save you a lot of time in the future.

I'll be back tomorrow with a tutorial on how you are going to get all of your new fabric images into EQ7 to start putting them into quilts.


Friday, October 23, 2015

Blogger's Quilt Festival - Fall 2015 - Riley Blake Triangle Quilt


It's that time of the year again...twice a year during quilt market, Amy, who blogs over at Amy's Creative Side, hosts the Blogger's Quilt Festival.  We are allowed to link up two quilts to the various categories and have the opportunity to visit and be inspired by other blogger's wonderful quilts.  I was so excited to be highlighted in March in one of Amy's Blogger's Quilt Festival Features.

My first entry to the festival is my Riley Blake Triangle Quilt which I designed and made for the Riley Blake challenge from the Modern Quilt Guild over the summer.  My post about the quilt and design can be found here and I am entering the quilt into the Small Quilt category


An equilateral triangle quilt has been on my to-do list forever and after I saw that some of the challenge fabrics had a repeating triangle print, I was sold.  In addition to making a triangle quilt for the first time, this was also the first time I had ever bound a quilt without 90 degree corners.


The quilt finished at about 48" x 48", a perfect size for a new baby.  I have a new niece or nephew due this in about a month and if the baby is a girl, I will be sending this quilt off to her. 


I knew that for the quilting in the background areas, I wanted to echo the hexagon shape formed by the print fabrics and then fill in the remaining space with a dense back and forth quilting.  I also wanted to mimic the quilting from the print areas in some of the background, negative space triangles.  I used a ribbon candy design in the print areas that once quilted, almost gave the hexagons quilting pattern that almost resembled a flower.


My other entry the Improv Table Runner is entered into the Modern Quilt category and can be found here.


Here are my entries over the years:

Spring 2015: Use Your Illusion
Spring 2015: Plus Plus - Two Tone Version

Fall 2014: Oh The Places You'll Go
Fall 2014: Vintage Star

Spring 2014: Kona 2013 Quilt
Spring 2014: Improv Quilt Two

Fall 2013: Pi Quilt
Fall 2013: Pink Broken Herringbone Quilt


If you have stopped by my blog for the first time from the quilt festival thank you!  You can find some of my finishes, newly revamped tutorials page, and mystery quilt-a-long on the tabs at the top of the page.  


If you would like to follow my blog, here are some links for some different following options: BloglovinEmailInstagram.


Blogger's Quilt Festival - Fall 2015 - Improv Table Runner


I love taking part in Amy's Quilt Blogger Festival twice a year over on her blog Amy's Creative Side.  We are allowed to link up two quilts to the various categories and have the opportunity to visit and be inspired by other blogger's wonderful quilts.  I was so excited to be highlighted in March in one of Amy's Blogger's Quilt Festival Features.

My second entry to the festival is my Improv Table Runner which I designed and made for my Aunt and Uncle's 50 wedding anniversary.  My post about the quilt and design can be found here and I am entering the quilt into the Modern category


I have always admired by Aunt's art, she has been creating longer than I have been alive. Growing up, we had many of her ceramics and mixed media paintings in our house. Based on her art, I thought she might appreciate some improvisational quilting.

I decided on using mostly blue and green solids I with a black print or two. I also included typewriter fabric (Cotton & Steel's Black and White collection) because it was just too cute not to.

To make the piece I started with a loose idea of how wide I wanted the runner to be and just I improv pieced a couple of green and blue strips. I played around with them to see how to fit them all together and added in some stripes of essex linen in black (I love the texture it adds) and some shiny Cotton & Steel to add some sparkle. 


I used a serpentine stitch on my Bernina for some quick quilting, marking the first line down the center and then using the edge of my walking foot for spacing each additional line. The runner finished at 15" x 48". My husband liked it so much he asked me to make another one for our buffet (which is modeling the runner in this picture).


My other entry my Riley Blake Triangle Quilt, which is entered into the Small Quilts category and can be found here.

Here are my entries over the years:


Spring 2015:  Use Your Illusion


Fall 2014:  Vintage Star


Spring 2014:  Kona 2013 Quilt

Spring 2014:  Improv Quilt Two

Fall 2013:  Pi Quilt

If you have stopped by my blog for the first time from the quilt festival thank you!  You can find some of my finishesnewly revamped tutorials page, and mystery quilt-a-long on the tabs at the top of the page.  


If you would like to follow my blog, here are some links for some different following options: BloglovinEmailInstagram.


Thursday, October 22, 2015

Cake Slices in The Quilter's Day Planner

My great quilty friend Stephanie, who blogs over at Late Night Quilter, just released a Day Planner for 2016 that’s specifically designed for quilters! 

The Quilter's Planner - Monthly Calendar


It’s a daily planner that will inspire you to achieve your goals, and organize both your personal life and your quilting life.  I am loving the idea of having my to-do lists for my quilting projects, home, and work life all in one place instead of in various calendars online, paper calendars, and post-it notes galore.

Plus the planner has graph paper to sketch out new quilt ideas for when you are sitting in the waiting room for your daughter's dance class (I get a surprising number of quilt ideas in that waiting room :) 

What's Inside:

Did you see the list above?  In addition to all of the calendar and sketching goodness, the Quilt Planner comes with 8 full quilt patterns!  Including one from me :)

I have the huge honor of my new pattern Cake Slices included in the planner (and I am very excited to be able to show you some of my secret sewing I was doing in September).

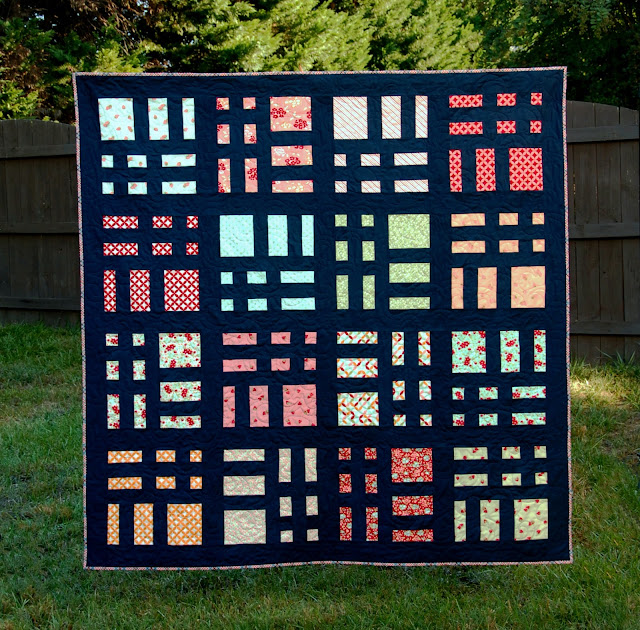
Cake Slices - A Layer Cake Friendly Lap Quilt

Cake Slices is a layer cake friendly pattern in a lap size.  For my quilt I used Hello Darling by Bonnie and Camille for Moda combined with Kona Navy as the background.  The design is very beginner friendly with few seams to match and uses just 16 layer cake slices to make a whole lap sized quilt!  

Many thanks to Cynthia (who blogs at Quilting is More Fun than Housework) who helped me pick a quilting pattern and thread color.  I tend to prefer thread colors that blend into the fabric (my number one tip for hiding mistakes).  I tried all sorts of thread colors on the quilt, but most looked pretty bad against dark blue background (which is a good portion of surface area of the quilt).  

Cynthia made this quilt back in June using another of Bonnie and Camille's lines with a dark blue background and a dark blue quilting thread.  She advised that as long as the quilting was not too dense, it would look good.  I used an open loop/hook pattern on the quilt with a little larger scale than I normally quilt with and I am super happy with it!  The quilting blends in so well in the background and gives the quilt a nice soft texture.

You can now find Cake Slices in my pattern shop and Etsy:

Meadow Mist Designs Pattern Shop

Etsy Shop


The Quilter's Planner has everything you need to organize your life, plan and track your sewing projects and be inspired to create something beautiful every day! The book is spiral bound so it lays nice and flat, is approximately 8 x 11, made in the USA, and will be shipped in time for the holidays.

Stephanie launched the planner on IndieGoGo on Tuesday to fund the printing of the planner. If you order a planner, you are guaranteed to receive a planner (no worry about the project meeting a funding goal). Stephanie has a wonderful video and more information on her website and IndieGoGo site, please take a minute and check them out :)


Here are just a few more images of the planner...


You can now find Cake Slices in my pattern shop and Etsy:

Meadow Mist Designs Pattern Shop

Etsy Shop


Thursday, October 15, 2015

Throw Back Thursday

Because no sewing is going on at my house right now, I thought it would be a good day to show one of my before-blogging-days quilts...about 3 years ago.  This was actually my first commissioned quilt made for a friend of my sister using my old Singer sewing machine.


This quilt is a perfect lesson on what not to do in a commission quilt, I think I made every mistake in the book at least once.

First off, it was my first time trying to pull fabrics and colors for a client.  To make it more difficult, the client was all the way over in France.  With the time change and my client being very non-committal on colorways, this process was long and overly drawn out.  I don't know how many hours I spent sending her pictures of sample quilts and quilt mockups to show her different color schemes.

Once we had finally figured out the color scheme (Vintage Modern by Bonnie and Camille for Moda Fabrics), I let her pick basically any pattern she found that she liked.  She selected Open Stars by Cozy Quilt which is a great, but time-consuming pattern.  I had already given her a basic estimate on price before the pattern was selected (yes I was an idiot) and so I kept the price the same even though my hours making the quilt just went up significantly.  In addition, the quilt comes in basically every size except for twin which is what she wanted, but I figured that it would not be too hard to change up the number of blocks to wind up with a twin.

I ordered the pattern (and the ruler) and then had to redo all of the fabric requirements and cutting instructions for a twin (taking more time to do this than I would care to admit).


After finally finishing the quilt top and quilting the quilt using a stipple pattern, I then made a bonus pillow with some of the scraps.


So long story short, when I added up all of my materials and hours spent on the quilt I estimated that I made between $1.50 and $1.75 an hour on this quilt  :(

Looking on the positive side, I can say that I really enjoyed making the quilt, at least I did not make enough mistakes that I actually lost money on the quilt (though I came close), and most importantly I never made this mistake with pricing a commission quilt again!

Another positive was that from making a 100+ flying geese I had tons and tons of tiny half square triangles left over.  I sewed a bunch of them together into a bag for my mother-in-laws birthday.


I am linking (for the first time) to Throwback Thursday @ A Quarter Inch from the Edge


Tuesday, October 13, 2015

EQ7 Tips and Tricks - Swap All Colors and Spraycan

(This tip is part of a growing EQ tutorial series, you can find all of my EQ Tips and Tricks right here.)


Welcome back for another EQ7 Tips and Tricks Tutorial.  I am first going to show you one of my most favorite tools in EQ7, the "Swap All Colors" button.


You can design quilts in many other programs like Power Point, Abobe Illustrator, Corel Draw, and others, but I have not found another program that allows for such quick and easy switching of colors and prints in a quilt rendering.

Here is our test quilt for today made up of a repeating chain block from EQ's block library in the original EQ provided colors.


Not bad, but I think that some of the pattern is lost because the 3 colors have lower contrast compared to each other.

To change all of one color within a quilt to another color:

1.  Select the "Swap All Colors" button on the right hand side of the screen.
2.  Select the color or fabric you would like to use.
3.  Click in the quilt on the color you would like to replace.  

The color within the quilt you click on will switch to the new color throughout the entire quilt.


With just a few clicks you have a whole different looking quilt and you can easily and quickly audition many colors and fabrics in your designs.


The next button to show is the Spraycan button which is the button right above the Swap All Colors button.  It works the same as the Swap All Colors button, but swaps the colors within a single block.


To change all of one color within a single quilt block to another color:

1.  Select the "Spraycan" button on the right hand side of the screen.
2.  Select the color or fabric you would like to use.
3.  Click in the quilt on the color you would like to replace.  

The color within the quilt block you click on will switch to the new color throughout the quilt block.


With a few clicks of the Spraycan button, I recolored the quilt blocks using a variety of April Showers by Bonnie and Camille prints.


I hope that you find these tutorials clear and helpful!  Let me know if you have any topics you would like me to cover.

I am very happy to link up with Let's Bee Social @ Sew Fresh QuiltsNeedle and Thread Thursday @ My Quilt InfatuationWIP Wednesday @ Freshly Pieced, and Tips and Tutorials Tuesday @ Late Night Quilter.


Friday, October 9, 2015

Updated Tutorials Page

Over the past months and years my tutorials page has become ungainly, messy, and woefully out of date.  One of my BQF (best quilt friends) mentioned that she loved my EQ7 tutorials and that it would be great to have them listed all in one place, hint hint.

Since there is no sewing for me due to my broken wrist, it freed up time to redo my tutorials page correctly.  I spent way too many hours trying to figure out how to go a grid of pictures in blogger before I gave up and tried to find a different work around.  I grouped the pictures of the tutorials into groups of threes with links below the pictures.

My tutorials page is now (hopefully) easy to find things and completely up to date with almost 30 tutorials.  I have organized the tutorials into the following categories:


Here is a peek of my quilt patterns tutorial group...


I hope that you will pop over to my tutorials page and take a look around!  I am linking up to finish Friday linky parties because I really think that this is a great (and way overdo) finish for me :)


Wednesday, October 7, 2015

WIP Wednesday - October 7th

While I am sidelined with a broken wrist, I thought that I would show you the baby quilt that I was working on before I had my little slip and fall at the rollerskating rink. 


I was making this baby quilt as a present for some of my sisters friends who are expecting a baby at the beginning of January. The couple had struggled for many years with infertility and so my sister wanted to gift them a bright and bold quilt. They are not finding out the sex of the baby so the quilt had to also be gender neutral. 

I had picked up this jellyroll of bold solid colors from the coats and Clark sale a couple of months ago and I thought it would be perfect for the baby quilt. 


Working with my sister, we quickly decided on a jellyroll quilt from the Moda Bake Shop called Wishes String Quilt by Karen Vail (of Cascade Quilts). The pattern is really cool because you sew the jelly roll strips into a tube and then using a special ironing and cutting trick you wind up with blocks with the white strip centered along the diagonal. 


I had laid out all of the blocks into the quilt top and was selling them together when I had my little accident. Once I get back on the sewing machine, my plan is to finish the quilt top and possibly add a white border. It is a good thing my sister does not need this until early next year :)  Here is a picture of my almost 15 year old kitty, Abby, modeling the blocks.


My other work in progress is mending my broken wrist.  I am happy to report that I went to the orthopedic doctor on Monday and he determined that I had such a small break that I only needed a removable brace now.  I can move my fingers and my elbow and take a shower without a bag duct tapped my arm!  I am so thankful for that, it makes life so much easier.  Still no sewing for me for at least another 3 more weeks.


I am very happy to link up with Let's Bee Social @ Sew Fresh QuiltsNeedle and Thread Thursday @ My Quilt Infatuation, and WIP Wednesday @ Freshly Pieced.


Tuesday, October 6, 2015

Winner - Machine Quilting with Style Blog Hop

Thank you all so much for entering the giveaway during the book hop for Christa Watson's new book, "Machine Quilting with Style".


Without further ado, the winner is Nancy!!


Congrats Nancy, your ebook is on its way :)  For those that did not win, just remember that you can get your copy of Christa's book, "Machine Quilting with Style" from:

Signed copy from ChristaQuilts.com
Martingale (publisher) – free e-copy with purchase of the book
Amazon