Sunday, February 27, 2022

QuiltCon 2022 Recap

 I'm back from QuiltCon 2022 and about caught up from the trip.  Traveling again was strange, but it was great to see so many quilters after two years.

I taught five workshops and was on one panel for a lecture, but I did have a chance to walk the show and meet up with friends.

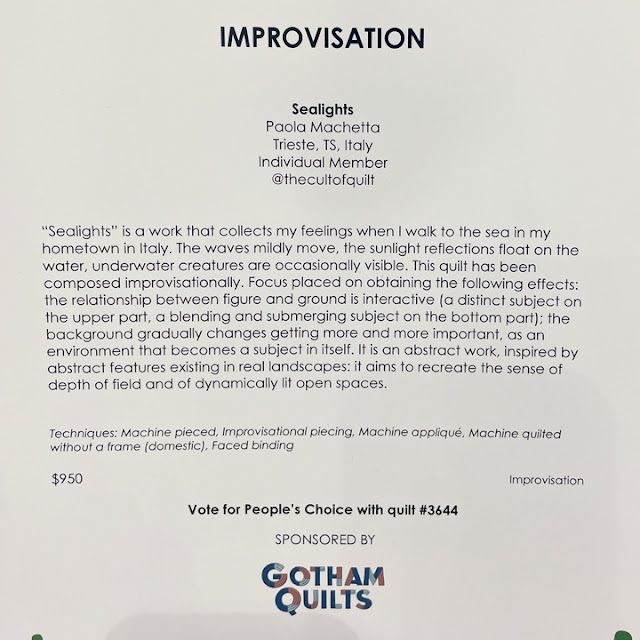
I took some pictures of quilts that caught me eye this year and would love to share them with you.  I noticed that I was drawn to bright and geometric designs this year.  I don't know if that was because of the lighting, my mood, or that I was walking the show after teaching for 9 hours the day before :)

The colors were really off on the pictures due to the lighting so I did my best to correct the colors.  The maker's and quilt's information are in the pictures below each quilt.


I hope you enjoyed this little slice of the quilt show :)


Thursday, February 3, 2022

Macaron Mystery ++ Block and Quilt Top Assembly

 It's reveal day for the Macaron Mystery Quilt!


This post is jam packed with Macaron Mystery goodness, so keep reading to find:

  1. Instructions for Blocks A, B, and C and the Block and Sashing Rows
  2. Quilt Top Assembly Instructions
  3. Quilt Finishing Instructions
  4. How to submit your quilt or quilt top into the reveal parade

We have come to the reveal of the mystery quilt design so hopefully you love the design!  Remember, you can always find all of the information and posts about the quilt along on the Macaron Mystery Page.

You will now have 2 months, until April 7th (midnight EST), to finish the quilt top / quilt and link up.  Check out the sponsors / prizes post to see the prizes from our 12 generous sponsors!

The Reveal parade post will be posted on Thursday, April 14th.  

On the 13th the pdf links from the posts will be removed.  The instructions will always be available in the blog posts and a full, easily printable version of the pattern will be available in my pattern shop.


ALL ABOUT LINKING UP

In order to keep this post from becoming too long, I have created a page that answers frequently asked questions, instructions on how to link your quilt up, and the actual quilt link up.  You can go to the page here.

Click here for more information and to link up your quilt top / quilt


MACARON MYSTERY INSTRUCTIONS

Without further ado, here are the final instructions for the Macaron Mystery quilt, I hope you love the design!

Click the links below for downloadable, easy to print versions of the instructions...


Block A

Combine the following pieces to make 4 block A 12 ½" x 12 ½". 

1.  Arrange the following blocks and pieces according to the diagram. 
4 doublet flying geese units 4 ½" x 4 ½"
4 snowball units 4 ½" x 4 ½"
1 bg1 square 4 ½" x 4 ½"

2. Sew units and pieces into rows pressing seams open or away from the doublet flying geese units.  Each row should measure 4 ½" x 12 ½".

3. Sew the rows together, pressing seams open, to make a block A 12 ½" x 12 ½".  

4. Repeat steps 1-3 to make a total of 4 block A 12 ½" x 12 ½".


Block B

Combine the following pieces to make 8 block B 12 ½" x 12 ½". 

1.  Arrange the following blocks and pieces according to the diagram (it does not matter which corner the HST unit is in). 

4 doublet flying geese units 4 ½" x 4 ½"
3 snowball units 4 ½" x 4 ½"
1 A/Bg2 HST unit 4 ½" x 4 ½"
1 bg1 square 4 ½" x 4 ½"

2. Sew units and pieces into rows pressing seams open or away from the doublet flying geese units.  Each row should measure 4 ½" x 12 ½".

3. Sew the rows together, pressing seams open, to make a block B 12 ½" x 12 ½".  

4. Repeat steps 1-3 to make a total of 8 block B 12 ½" x 12 ½".


Block C

Combine the following pieces to make 6 block C 13" x 13".
 
1.  Arrange the following blocks and pieces according to the diagram. 

2 divided triangles 5" x 5"
2 doublet flying geese units 4 ½" x 4 ½"
1 snowball unit 4 ½" x 4 ½"
1 Bg1 triangle 5" x 5"

2. Sew units and pieces into rows pressing seams open or away from the doublet flying geese units. Note: some of these edges are on the bias which means they are more prone to stretching and warping.

3. Sew the rows together, pressing seams open, to make a block C.  

4. Repeat steps 1-3 to make a total of 6 block C.


Setting Triangles

The Macaroon Mystery Quilt is assembled on-point.  Below are listed both the exact measurements for the setting triangles and a more generous cutting size (an extra ½") for easier piecing (trimmed to size after the quilt top is sewn together).  

1.  Cut 1 Bg2 strip 18 ¼" x WOF (18 ¾" if oversizing).
a. Sub-cut the strip into 2 Bg2 squares 18 1/4" x 18 1/4" (18 ¾" x 18 ¾" if oversizing).  

2. Cut the Bg2 squares 18 ¼" x 18 ¼" in half twice on the diagonal to form 8 Bg2 setting triangles (you will only use 6 of the setting triangles).


3. Place a fabric D square 2" x 2" right sides together in the right-angle corner of a Bg2 setting triangle.  Draw a diagonal line using a removable marking device on the back of the fabric D square (shown as the solid line).  

5. Sew along the marked line.  Trim ¼" from the seam line and press the seam open or towards fabric D.

6. Repeat steps 3-5 for each of the 6 setting triangles.


Block Rows
Note:  The Bg2 rectangles 3 ½" x 15 ½" and 3 ½" x 17 are longer than needed and will be trimmed after the quilt top is assembled.

BLOCK ROW 1

Sew together the following pieces and blocks to make a block row 1, pressing seams open or towards the Bg2 rectangle.  Repeat to make a total of 2 block row 1.

1 block C
1 sashing triangle
1 Bg2 rectangle 3 ½" x 15 ½"


BLOCK ROW 2

Sew together the following pieces and blocks to make a block row 2, pressing seams open or towards the Bg2 rectangles.  Repeat to make a total of 2 block row 2.

2 blocks B (be sure to rotate the blocks B to match the illustration)
1 block C
1 sashing triangle
3 Bg2 rectangles 3 ½" x 12 ½"


BLOCK ROW 3

Sew together the following pieces and blocks to make a block row 3, pressing seams open or towards the Bg2 rectangles.  Repeat to make a total of 2 block row 3.

2 blocks A
2 blocks B (be sure to rotate the blocks B to match the illustration)
1 block C
1 sashing triangle
5 Bg2 rectangles 3 ½" x 12 ½"


Sashing Rows
Note:  The Bg2 rectangles 3 ½" x 15 ½" and 3 1/2" x 17 are longer than needed and will be trimmed after the quilt top is assembled.

SASHING ROW 1

Sew together the following pieces and units to make a sashing row 1, pressing seams open or towards the Bg2 rectangles.  Repeat to make a total of 2 sashing row 1.

1 SiaS unit 3 ½" x 3 ½"
2 Bg2 rectangles 3 ½" x 17"


SASHING ROW 2

Sew together the following pieces and units to make a sashing row 2, pressing seams open or towards the Bg2 rectangles.  Repeat to make a total of 2 sashing row 2.

3 SiaS units 3 ½" x 3 ½"
2 Bg2 rectangles 3 ½" x 12 ½"
2 Bg2 rectangles 3 ½" x 17" (on the ends of the row)


SASHING ROW 3

Sew together the following pieces and blocks to make a sashing row 3, pressing seams open or towards the Bg2 rectangles.  Make only 1 sashing row 3.

5 SiaS units 3 ½" x 3 ½"
4 Bg2 rectangles 3 ½" x 12 ½"
2 Bg2 rectangles 3 ½" x 15 ½" (on the ends of the row)


Quilt Top Assembly

1. Arrange and sew together the block rows and sashing rows according to the Quilt Top Assembly diagram on page 12, pressing the seams open. 

Tip: Aligning the Bg 2 rectangles from the block rows with the square in a square blocks in the sashing rows will help with the quilt top layout and sewing.  

2. Trim the excess Bg2 rectangles (and setting triangles if oversized) to make the quilt top edges straight and square as shown in the diagrams below.

3.  The quilt top should measure about 64" x 64".


Finishing


1.  Make backing: Remove selvages from backing fabric, cut into 2 pieces approx. 72" x WOF and sew backing pieces together along the trimmed selvage edges using a ½" seam, pressing the seam open.  Trim backing to approx. 72" x 72".

2.  Layer the quilt top, batting, and backing.   Baste and quilt as desired.

3.  Cut the binding fabric into 7 strips 2 ½" x WOF.  Trim off selvages and sew together end-to-end to make the binding.  Bind and enjoy your quilt!


Share Your Quilt

You can share your in-progress and finished pictures of your mystery quilt on the Meadow Mist Designs Facebook group: www.facebook.com/groups/MeadowMistDesigns/ and on Instagram and other social media using #MacaronMysteryQuilt and #MeadowMistDesigns.

Be sure to link up your quilt top or finished quilt into the reveal party parade here to be eligible to win prizes from one of the 13 sponsors of the quilt along!

What do you think of the Macaron Mystery quilt design?


Any questions?  Leave them in a comment below or post them to our Facebook group page.  I look forward to seeing everyone's quilts!!