Saturday, September 30, 2023

Favorite Finish Monthly Linkup - September 2023

  Welcome to September's Favorite Finish Monthly Linkup!


Happy September!  I am looking forward to seeing everyone's finishes for the month.  I have a bunch of quilts in the works this month, but no finishes, so I would love to see yours!


Ready for the party?  

Here is a reminder of the party details:
  • The linky party will open at 12:01am EST on the last day of the month and will be open for 5 days, through the 4th at 11:59 pm EST.
  • For instructions on how to link up blog, Instagram, or pictures from your computer (there is now a way to just upload a picture without a web link) to the party, click here.  
  • If linking a blog post, I ask that you please add a link back to the party.
  • Please visit at least 3 other links (and preferably leave comments) to share the love and celebration :)
I hope you join in by checking out the posts or linking your favorite finish of the month!

You are invited to the Inlinkz link party!

Click here to enter


Thursday, September 7, 2023

Malted Mystery ++ September Instructions


Welcome to the September set of instructions for the Malted Mystery Quilt! 


The Malted Mystery Quilt is a free quilt-along that runs from July 2023 through May 2024 with a set of directions revealed the first Thursday of every month. 

There is plenty of time to join in on the quilt along, instructions are published monthly and we just got started! You can find all of the information about the Malted Mystery, including schedule, past instructions, links to the Facebook group, sneak peek, and more in the Main Malted Mystery Quilt Page.


Easy to Print PDF Instructions

You can find the easy to print version of the September instructions right here:


Half-Square Triangle (HST) Units 

Combine 24 fabric A squares 3" x 3" and 24 bg squares 3" x 3" to make 48 A/bg HST units 2 ½" x 2 ½".

1. Place a fabric A square 3" x 3" and a bg fabric square 3" x 3" right sides together.  Draw a diagonal line using a removable marking device on the back of the lighter square (shown as the solid line). 

2. Sew a ¼" seam on either side of the solid line (shown as the dotted lines).  Cut on the solid line and press seams open or toward the darker fabric.  

3. Trim each A/bg HST unit to 2 ½" x 2 ½".  

4. Repeat to make a total of 48 A/bg HST units 2 ½" x 2 ½".


Combine 32 fabric A squares 2 ¾" x 2 ¾" and 32 bg squares 2 ¾" x 2 ¾" to make 64 A/bg HST units 2 ¼" x 2 ¼".

1. Follow the steps above using the fabric A squares 2 ¾" x 2 ¾" and bg fabric squares 2 ¾" x 2 ¾".  Trim each A/bg HST unit to 2 ¼" x 2 ¼".  

2. Repeat to make a total of 64 A/bg HST units 2 ¼" x 2 ¼".


** With the two HST units using the same fabrics and being so close in size, you can use these labels to keep them organized. **
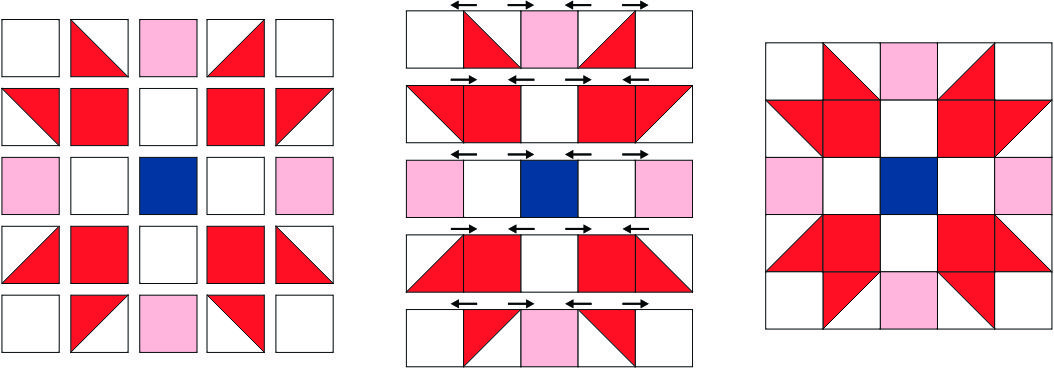


Sister Block
Combine the following pieces to make a sister block 10 ½" x 10 ½". 

1.  Arrange the following units and pieces according to the illustration. 

8 A/bg HST units 2 ½" x 2 ½"
4 fabric A squares 2 ½" x 2 ½"
4 fabric B squares 2 ½" x 2 ½"
1 fabric C square 2 ½" x 2 ½"
8 bg squares 2 ½" x 2 ½"

 2. Sew together the units and pieces into rows, pressing seams open or following the arrows.  

Sew the rows together, pressing the seams open, to make a sister block 10 ½" x 10 ½".  


Plus Blocks

Combine the following pieces to make plus blocks 4 ½" x 4 ½".

1.  Arrange the following pieces according to the illustration. 

1 fabric C rectangle 1 ½" x 4 ½"
2 fabric C rectangles 1 ½" x 2"
4 bg squares 2" x 2"

2. Sew together the pieces as shown, pressing the seams open or following the arrows, to make a plus block 4 ½" x 4 ½".  


3. Repeat to make a total of 4 plus blocks.
 

T Blocks

Combine the following pieces to make T blocks 4 ½" x 9 ½". 

1.  Arrange the following pieces according to the illustration. 

1 fabric C rectangle 1 ½" x 7"
2 bg rectangles 2" x 7"  

 2. Sew together the pieces as shown, pressing the seams open or following the arrows.  


3. Sew together the following pieces onto the unit from step 2 as shown, pressing the seams open or following the arrows, to make a T block 4 ½" x 9 ½".  

1 fabric C rectangle 1 ½" x 4 ½"
1 bg rectangle 2" x 4 ½"


4. Repeat to make a total of 8 T blocks.


I-Beam Blocks

Combine the following pieces to make I-beam blocks 4 ½" x 12 ½". 

1.  Arrange the following pieces according to the illustration. 

1 fabric C rectangle 1 ½" x 7 ½"
2 bg rectangles 2" x 7 ½"

2. Sew together the pieces as shown, pressing the seams open or following the arrows. 


3.  Sew together the following pieces onto the unit from step 2 as shown, pressing the seams open or following the arrows, to make an I-beam block 4 ½" x 12 ½".

2 fabric C rectangles 1 ½" x 4 ½"
2 bg rectangles 2" x 4 ½"


4. Repeat to make a total of 4 I-beam blocks.


Many thanks to the generous sponsors of the Malted Mystery Quilt!

Many thanks to our generous sponsors!

Any questions? Leave them in a comment below or post them to our Facebook group page. I look forward to seeing everyone's cut fabrics. The next set of instructions will be published on the first Thursday of October, the 5th.


Wednesday, September 6, 2023

Windmill Pattern Release

It's pattern release day!  The Windmill pattern is now available!


You can grab a copy of Windmill for the special introductory price of $9.95 now through Sunday, September 10th.

My Pattern Shop - Digital and Pre-order Print Versions (Print versions will shipped around 9/13-15)
Etsy Shop - Digital Version

ABOUT THE DESIGN

Windmill is based on the traditional Flying X quilt block. The pattern scrap friendly (baby) and fat quarter and layer cake friendly (throw and queen) and is written at a confident beginner levels, or scraps.

ABOUT THE FABRIC & QUILTING

Andover generously supplied the fabric for the cover version.  The prints were from Alison Glass which were paired with Century Solids, all by Andover Fabrics.  The backing is a pink solid fabric.

Delia of Willow Lark (@willowlarkqs) pieced and quilted the cover quilt.  She did a beautiful job arranging the prints, helping picking out a background fabric, and quilting the swirl design on the quilt.


PATTERN DETAILS

The pattern scrap friendly (baby) and fat quarter and layer cake friendly (throw and queen) and is written at a confident beginner levels, or scraps.

The pattern is on sale in my pattern shop and on Etsy at a special introductory price of $9.95 now through Sunday, September 10th (midnight ET).  Once you make an Windmill quilt of your own, you can share it via social media using the hashtag #WindmillQuilt.

In both my pattern shop (digital and pre-order print) and Etsy, you can combine this intro sale price with an additional coupon for more savings. Use the code "TWOPATTERNS" for $2 off 2 patterns and "THREEPATTERNS" for $4 off 3 patterns.


ADDITIONAL COLORWAY RENDERINGS

I love seeing how the quilt pattern looks with different colors, prints, backgrounds and more. It gives me an idea of the versatility of the design and it is so fun to see the different options.


MANY THANKS

I would like to thank Yvonne @Quilting Jetgirl for her amazing tech editing skills, Delia Dorn of Willow Lark for making the cover quilt, and Andover Fabrics for the fabric.


Remember, you can get a digital version of the Windmill pattern in the Meadow Mist Designs pattern shop (digital and pre-order print) and Etsy for only $9.95 through Sunday, September 10th (midnight ET)

The pre-ordered printed patterns will be shipped around Sept. 13th-15th.

You can combine this intro sale price with an additional coupon for more savings (these codes work for both my shop and Etsy). 

Use the code "TWOPATTERNS" for $2 off 2 patterns and "THREEPATTERNS" for $4 off 3 patterns.