

Welcome to the March set of instructions, the final instructions for the Malted Mystery Quilt!
It's Quilt Reveal Time!
I hope that you love the design! The reveal parade is not until May so there is plenty of time to get caught up or even start.You can find all of the information about the Malted Mystery, including schedule, past instructions, links to the Facebook group, sneak peek, and more in the Main Malted Mystery Quilt Page.
The Malted Mystery Quilt is a free quilt-along that runs from July 2023 through May 2024 with a set of directions revealed the first Thursday of every month. Be sure to join the Facebook Group to share your progress or share on social media using #MaltedMysteryQuilt.

Third Pieced Section
Easy to Print PDF Instructions
Now that the Malted Mystery quilt along has ended, you can find a easy to print, full version of the pattern for sale in my pattern shop: Easy to Print Version of Malted Mystery Quilt.
1. Sew together the following blocks, pressing the seams open or away from the pinwheel blocks, to make a row 4 ½" x 54 ½".
2 pinwheel blocks 4 ½" x 12 ½"2 T blocks 4 ½" x 9 ½"1 I-beam block 4 ½" x 12 ½"

Note the orientations of the pinwheel and T blocks.
2. Repeat to make a total of 4 rows.
3. Two of these rows will be used as side rows 4 ½" x 54 ½".
4. Sew a plus block 4 ½" x 4 ½" on either end of a row from step 1 to make a top/bottom row 4 ½" x 62 ½". Repeat to make a second top/bottom row.

5. Sew a side row 4 ½" x 54 ½" onto either side of the quilt top 54 ½" x 54 ½", pressing the seams open or away from the side rows.
6. Sew a top/bottom row 4 ½" x 62 ½" onto the unit from step 5, pressing the seams open or away from the top/bottom rows.
The quilt top, after the third pieced section is added, should measure 62 ½" x 62 ½".
PIECING TIP: If your rows are too large or too small compared to the quilt top, you can use the illustration below to add or take away length to the rows.


THIRD PLAIN BORDER SECTION
1. Cut 8 fabric D strips 2 ½" x WOF.
2. Sew together 2 fabric D strips 2 ½" x WOF and trim to 62 ½" to make a side border 2 ½" x 62 ½". Repeat to make a second side border.
3. Sew borders onto the sides of the quilt, pressing seams open or towards the borders.
4. Sew together 2 fabric D strips 2 ½" x WOF and trim to 66 ½" to make a top/bottom border 2 ½" x 66 ½". Repeat to make a second top/bottom border.
5. Sew borders onto the top and bottom of the quilt, pressing seams open or towards the borders.
The quilt top should measure 66 ½" x 66 ½".

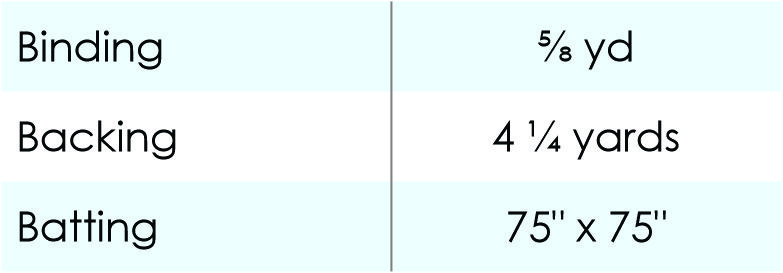
1. Make backing: Remove selvages from backing fabric, cut into 2 pieces approx. 76" x WOF and sew backing pieces together along the trimmed selvage edges using a ½" seam, pressing the seam open. Trim backing to approx. 75" x 75".
2. Layer the quilt top, batting, and backing. Baste and quilt as desired.
3. Cut the binding fabric into 7 strips 2 ½" x WOF. Trim off selvages and sew together end-to-end to make the binding. Bind and enjoy your quilt!
Share Your Quilt
You can share your in-progress and finished pictures of your mystery quilt on the Meadow Mist Designs Facebook group: www.facebook.com/groups/MeadowMistDesigns/ and on Instagram and other social media using #MaltedMysteryQuilt and #MeadowMistDesigns.
The instructions to link up your quilt top / finished quilts for the reveal parade will be posted next week.
Many thanks to the generous sponsors of the Malted Mystery Quilt!
Many thanks to our generous sponsors!

Any questions? Leave them in a comment below or post them to our Facebook group page. I look forward to seeing finished quilt tops!


Thank you for another fun mystery. This one may be my favorite so far.
ReplyDeleteLove it! This is an absolutely beautiful quilt. Can't wait to do these last steps!
ReplyDeleteIt's going to be fun to see all the quilt finishes start to be shared!
ReplyDeleteI love it! Thank you for all of your hard work!!
ReplyDeleteLOVE the quilt pattern! I'm excited to see how it looks when it's finished! Thank you so much!
ReplyDeleteDoes the quilt have to be quilted and bound to put in the parade and possibly qualify for prizes ?
ReplyDeleteHi Cynthia! To enter the reveal parade you can submit a quilt top or finished quilt :)
DeleteDoes the quilt have to be quilted and bound to enter parade and qualify for prizes?
ReplyDelete