Saturday, May 31, 2014

WIP - MQG Challenge Quilt - Update #2

For the Modern Quilt Guild Challenge, I have been working steadily on my challenge quilt.  I showed you the completed quilt top in this post and now I have been working on quilting the 70" square quilt.

I am now over 10 hours into the quilting (I like quilting but I must admit that I am about done with this one). In the dark gray sections I used a dense back and forth quilting pattern with the lines being about 1/4 inch apart.  I knew that it was going to take a while but I did not think that it would be this long (I am glad that I abandoned the matchstick quilting idea).  To give you an idea on size, the outer most border alone is over a yard x WOF total area to quilt.


I am now in the middle of quilting the patterned areas with a small meandering pattern.  I wanted something that would contrast with the more geometric areas in gray and meandering seemed to fit the bill.

Here is a view of the quilt back showing some of the quilting.


My hope is to have this quilt finished up by this upcoming Friday.  I can see the end of the quilt and I am excited to finish up :)

I hope that you are having a wonderful weekend!


Tuesday, May 27, 2014

Blind Stitch / Ladder Stitch Tutorial


A hand stitch called a ladder stitch (also called a blind stitch) is used to sew an opening you left in a sewn object to turn it right side out (like pillows, pincushions, stuffed animals...).  The stitch is almost invisible and forms a ladder like structure as you sew, hence the name.  I learned the stitch from reading blogs and tons of practice so this tutorial incorporates my learnings and tricks to try to make the blind/ladder stitch as easy, invisible, and pain free as possible.

Start with your sewn object stuffed and ready for the opening to be sewn shut.  In this demonstration, the object is a cathedral window pincushion stuffed with polyester stuffing.

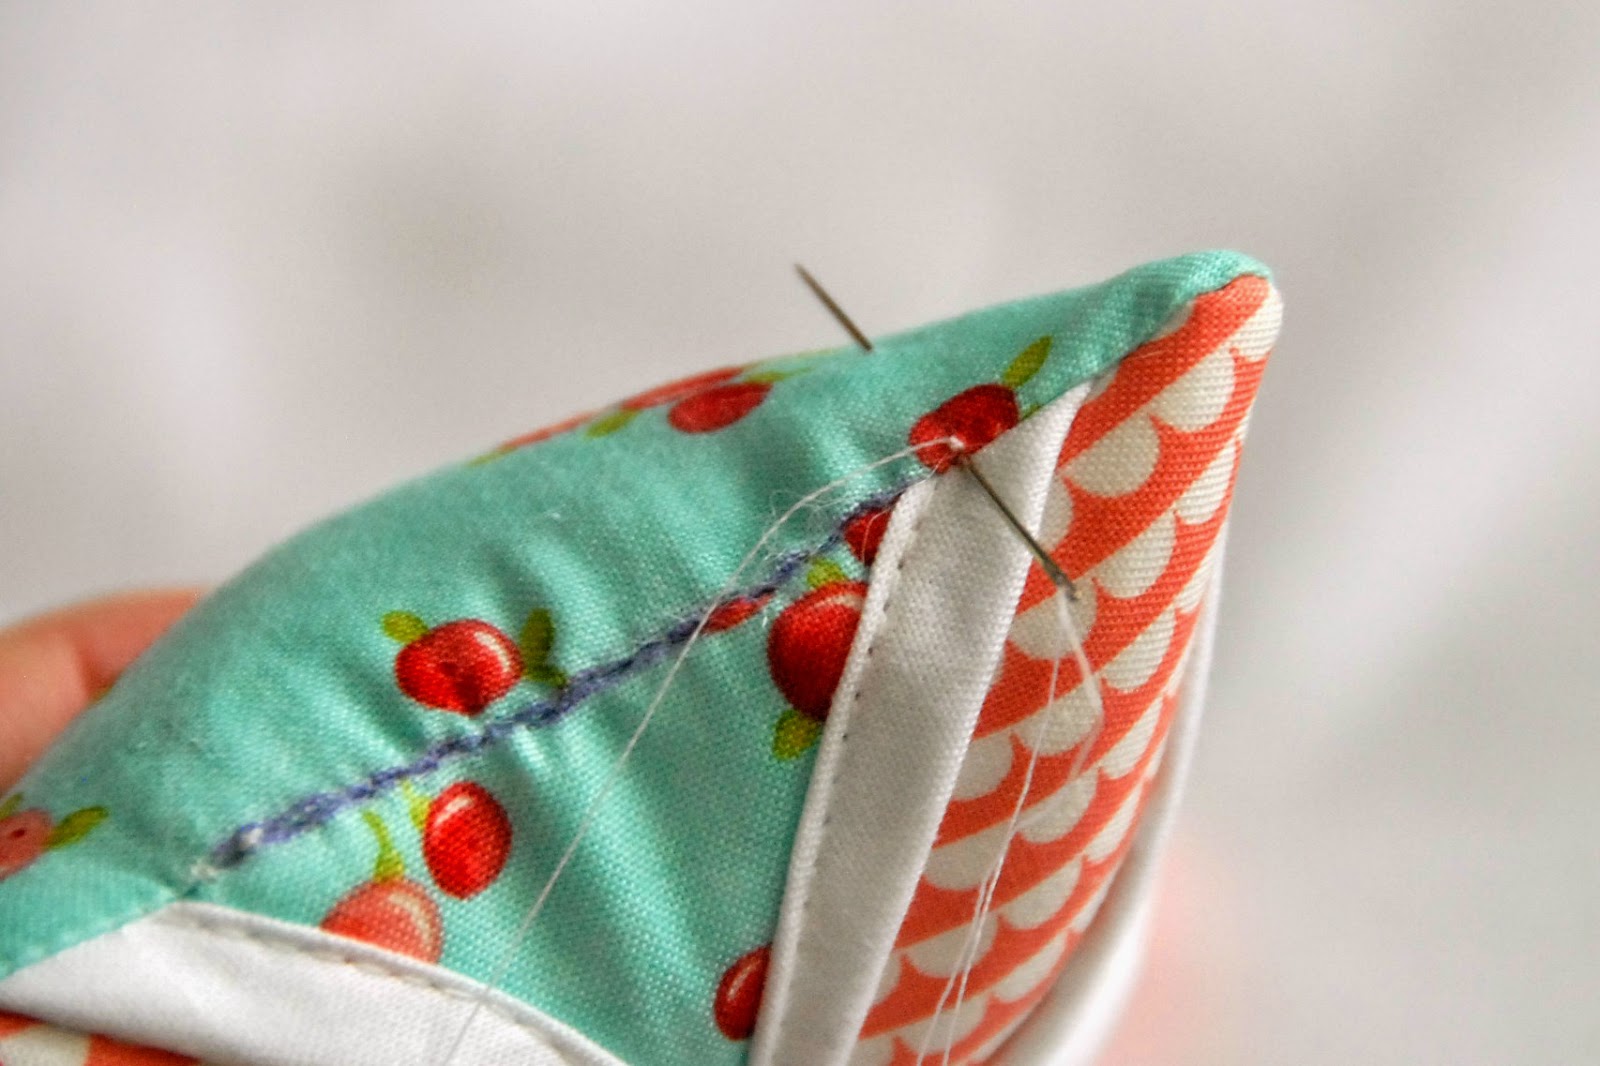
1.  Begin by marking (using a removable marking device), the stitching line to follow, starting from the sides of the opening and working towards the middle.  Alternatively, you may iron the opening to make a crease to show where to sew, but I find making a sharp crease difficult (and find that it disappears half way through sewing) so I like to mark with the purple markers that disappear after a short time.


2.  Thread the needle with the thread, form a knot at the end of the thread, and insert the needle into the side of the opening right where the stitching as ended.  (For thread, I recommend a stronger thread such as a polyester thread or a cotton covered polyester core thread as they have a lower tendency to break than all cotton.)


3.  Next (and this next step is the key to an invisible stitch), insert the needle into the opposite fabric directly across from where it came out of the first fabric.  To achieve this, I pull the thread across the seam perpendicular to the marked lines and insert my needle right where the thread crosses over the marked line. Take a horizontal stitch along the marked line (my stitches are about an 1/8" of an inch) from one side of the opening towards the middle.


Here is the step again...


4.  Repeat steps 3 and 4 about 4-8 times, then holding the fabrics together to close the partially stitched seam, pull the thread to tighten the partial seam.  The more "stuffed" the item is, the more often you should tighten these partial seams as trying to tighten the thread across the entire seam at once may cause the thread to break (ask me how I know).


5.  When you have done the blind/ladder stitch all of the way to the other side of the opening, make 2-3 knots to secure the thread, then insert the needle though the pincushion right next to the knit, and tug on the thread a little to bury the knot. 


6.  Trim the tail of the thread off (and remove the removable markings) and now you have a beautiful, almost invisible hand sewn seam!


I hope you have enjoyed this tutorial!  As this is my first technique tutorial, please contact me via e-mail with any questions, comments, or suggestions to improve it

Thanks!

I'm linking up to  Sew Cute Tuesday @ Blossom Heart QuiltsFabric Tuesday @ Quilt StoryLet's Bee Social @ Sew Fresh QuiltsNeedle and Thread Thursday @ My Quilt Infatuation, and Sugar Bee Crafts.


Saturday, May 24, 2014

WIP - MQG Michael Miller Challenge

One of the great benefits of being in the Modern Quilt Guild is the opportunity to participate in some fun challenges.  In this challenge, we each received 6 fat eighths of Michael Millers Petal Pinwheels fabrics (one was actually from other line which I forget the name of).  I knew that I wanted to make something bigger than the fat eighths would allow for so I ordered a selection of the Petal Pinwheels prints in fat quarters and half yards from Etsy.

I went around and around designing different options, at one point design a paper pieced lap size quilt having over 2,000 pieces.  Needless to say, that design was scrapped.  

I settled on a modern interpretation of a court house block.  I used the petal pinwheels to create scrappy layers, made the layers having different thicknesses, and made the block really big (the quilt is about 70 inches square) and here is my finished quilt top:


I like how the dark gray borders add a bold geometric component to the quilt.  My plan for the quilting is to maybe matchstick (or something similar) in the dark gray and some other (not yet selected) quilting in the petal pinwheels fabrics.  A quick trip to my LQS and I now have an Aurifil thread to match the Kona Coal.


Also as a little reminder, voting is now open over at the Blogger's Quilt Festival so hop on over to vote.  I have quilts in the ROYGBIV and mini sections.


Saturday, May 17, 2014

Sew Mama Sew Giveaway Winner

Thank you all so much for the super response to this year's Sew Mama Sew Giveaway Day! There were a total of 743 entries for the Tula Pink Fabric Bundle Blender Bundle (18 Fat Quarters from the Tula Pink Acacia, Salt Water, Birds and Bees collections) from Vintage Modern Fabrics.


Without further ado, Random.org has selected comment #437.
Which was Cindy Dahlgren!


Congrats Cindy, I have just sent you an e-mail.  Please send me your mailing address and your fabric will be shipped to you directly from Vintage Modern Fabrics.

Thank you so much to everyone who decided to follow my blog.  I hope to bring you fun and useful content and most importantly get to know you all!!

Thanks!
Cheryl


Friday, May 16, 2014

Blogger's Quilt Festival - Spring 2014 - Improv Quilt Two

It's that time of the year...twice a year during quilt market, Amy over at Amy Creative Side hosts a Blogger's Quilt Festival.  We are allowed to link up two quilts to the various categories and have the opportunity to visit and be inspired by other blogger's wonderful quilts.

The second quilt I am going to link up is my Improv Quilt two which I made using improv piecing using a bunch of different solid blue Kona scraps left over from my son's quilt.  I quilted the mini using matchstick quilting in a light grey Aurifil thread and faced it instead of binding it.  The quilt finished at about 13" x 18".  My original post of the quilt is here and I am linking this quilt up to the Mini Quilt Category.


My first quilt I am linking is my Kona 2013 Quilt in the ROYGBIV Quilt Category.

Thank you so much for stopping by!!
Cheryl