Friday, November 11, 2016

MQG 10 x 10 Challenge

I saw back in September that the Machine Quilting Unlimited magazine was hosting a challenge to celebrate their 10 year anniversary. The rules were to create a 10" x 10" (finished) mini quilt that referenced the number 10 in some way.


I have been working on a bunch of secret sewing projects and was happy to be able to create this mini to break up the larger sewing projects.

Being that the theme of the mini quilt revolved around time, I felt that the hourglass block would be a fitting starting point. I modernized the hourglass by forming the block from random solid stripes and by the orientation and placement within the quilt top. 

 The number 10 is represented in the mini quilt by the use of the 10 colored stripes that make up the deconstructed hourglass block. I used paper piecing to sew the block to maintain the alignment and spacing of the strips.

I quilted the quilt by echoing two interacting curves.  I just traced the curve of a plate onto the quilt and then echoed the line.  I auditioned a bunch of alternatives for the binding and thought that the striped binding really added a fun detail. 


Alas, I was not one of the ten finalists, just a had a great time making the mini!


Wednesday, November 9, 2016

Foothills Charity Finish No. 2

The Foothills Piecemakers Quilt Guild (my local traditional quilt guild) makes philanthropy quilts with members making blocks, making quilt tops, and/or quilting the quilts for various charities.

I did not make this quilt top but offered to quilt and bind it. The quilt was made using various red Kaffe Fassett prints. Very bright and busy...great for hiding quilting mistakes :)

Charity quilts are wonderful quilts to practice new quilting and binding techniques. It is a win for the quilter to practice a skill and a win for the guild to have some of the quilt tops finished into quilts. 

I have a twin size quilt that I wanted to quilt with large paisley-like overall pattern.  This baby/toddle sized charity quilt was the perfect practice piece.  

I quilted using a magenta colored Aurifil thread (which is hard to see due to the fabric prints, you can see it a little better on the blue print background).  


I used the blue backing fabric for the binding as well, I think that the blue is a great contrast to the crazy bright magentas of the quilt top.  I sewed the binding on completely by machine, which is great to practice as I normally hand sew on all of my bindings.


This quilt is now off to a good home through the guild's charity program.


Thursday, November 3, 2016

Meadow Mystery Quilt - Flying Geese and Square in a Square - November Instructions


Welcome to the November instructions for the Meadow Mystery Quilt! If you just found this mystery quilt, there is still plenty of time to join in and catch up!

In case you are new to the Meadow Mystery Quilt here are some links to all of the relevant information:

Mystery Quit Tab (main page containing links to all monthly instructions and other information)

Link to Signup for Easy to Print pdf Versions of the Instructions (via e-mail)

Mystery Quilt Facebook Group

And now onto the November directions :) This month we will be making flying geese and square in a square units.  Just as a reminder, here are the corresponding fabric letters to colors used in these illustrations:


Flying Geese Units


Combine the following fabric squares to form Flying Geese Units using the No Waste Flying Geese method outlined below (1 Fabric B square and 4 Fabric A squares will yield 4 flying geese units):
4 Fabric B squares (5 ¼” x 5 ¼”) and 16 Fabric A squares (3” x 3”) to form 16 Flying Geese Units (2 ½” x 4 ½”). 

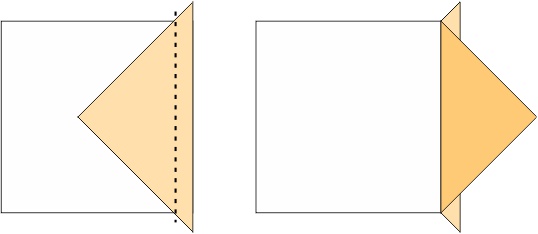
1.   Place 2 of the Fabric A squares (3” x 3”) on opposite corners of a Fabric B square (5 ¼” x 5 ¼”) right sides together.  (The Fabric A squares will overlap in the middle of the Fabric B square.)  Use a removable marking device to make a line diagonally across the Fabric A squares (solid line).


2.   Sew scant ¼” seam on either side of the marked line (dotted lines) and then cut on the marked line (solid line).


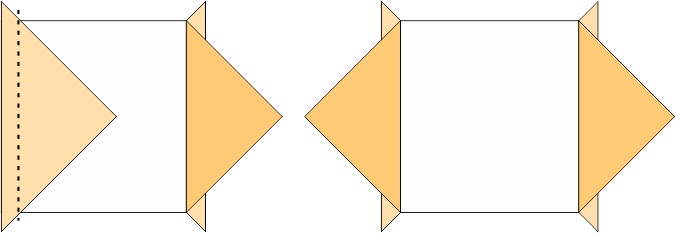
3.   Press seams towards the Fabric A squares. (You will have two of these intermediate units.)  For each intermediate unit, place a Fabric A square (3” x 3”) on the corner the Fabric B square right sides together.  Draw a diagonal line on the Fabric A square (solid line) and sew a scant ¼” on either side of the marked line (dotted lines).


4.   Cut on the marked line (solid line) and press seams open or towards the Fabric A squares.  (Each set of 1 Fabric B square and 4 Fabric A squares will yield 4 flying geese.)


Repeat to form a total of 16 Flying Geese Units.  Cut off tabs (also known as dog ears) and trim blocks to 2 ½” x 4 ½” if necessary, making sure there is ¼” between the point of the goose triangle and the edge of the unit.

Square in a Square Units (SiaS Units)

Combine the following fabric pieces to form Square in a Square (SiaS) Units using the method outlined below:

16 Fabric E squares (3 3/8” x 3 3/8”) and 32 Fabric A squares (3” x 3”) to form 16 Square in a Square (SiaS) Units (4 ½” x 4 ½”).

1. Cut each Fabric A square (3” x 3”) in half once diagonally to form 64 Fabric A triangles (3” x 3”).

2. Center a Fabric A triangle (3” x 3”) along one side of a Fabric E square (3 3/8” x 3 3/8”) right sides together.  Sew along the edge with a scant ¼” seam (shown as a dotted line), pressing seam open or outwards.


3. Sew another Fabric A triangle (3” x 3”) on the side of the square opposite to the first seam, pressing seam open or outwards. (Note: you can sew both of these triangles on then press instead of pressing after each addition.)


4. Continue by sewing two more Fabric A triangles onto the remaining outside edges of the square, pressing seams open or outwards.


5. Trim off the tabs (dog ears) formed by the sewn on triangles and square the unit to 4 ½” x 4 ½” (if necessary) making sure there is ¼” between the corner of the inner square and the outer side of the unit.  Repeat to form a total of 16 SiaS units (4 ½” x 4 ½”).


Be sure to share your progress in our Facebook Group :)

Many thanks to our sponsors!!


Friday, October 28, 2016

At Quilt Market in Spirit

The season of Quilt Market and Quilt Festival is upon us once again ... one day I hope to be able to go. I could not attend this year, but I will be there in spirit in the form of two quilts.

**If you attend Quilt Market and/or Festival and see my quilts hanging, I would love a picture :)

Use Your Illusion will be hanging in the Modern Quilt Guild Showcase exhibit.


My Quilt Theory quilt Jelly Lanterns will be hanging in the Quilter's Planner booth along with other Quilt Theory quilts Cross Cabins and Highland Tile. You can stop by the booth to say hi to fellow Quilt Theory designers Stephanie @Late Night Quilter and Yvonne @ Quilting Jetgirl and purchase hard copies of all of the Quilt Theory patterns available (as well as the awesome Quilter's Planner).
  

The remaining Quilt Theory quilts will be hanging in other areas in the show. Ocean Path, Strip It Down, and Tiled Parquet will be hanging in the Checker Distributor’s booth and Scrappy Geese will be hanging in the Michael Miller Fabrics booth.  

Be sure to follow @Quilt.Theory on Instagram for updates of all the market and festival fun.


Wednesday, October 26, 2016

Meadow Mystery Quilt {My Hourglasses}

This month for the Meadow Mystery Quilt we made some half and full hourglass units. The Facebook group so full of some wonderful versions. If you want to join in, it is not too late!

Some links for more information:


I am making two versions of the Meadow Mystery Quilt, a more traditional version using Gentle Breezes by Maywood Studio and a more modern version using some of my favorite text prints. 

I have had a very full month of secret sewing projects and making Halloween costumes, so I only have the Modern Text half and full hourglass units to share today.  Having the instructions sent out monthly is very nice when you get behind, plenty of time to catch up :)


The instructions are given out on the first Thursday of every month so the next set of instructions will be posted on the blog next Thursday, November 3rd.

I am linking up with Let's Bee Social at Lorna @ Sew Fresh Quilts and Needle and Thread Thursday at Kelly @My Quilt Infatuation.