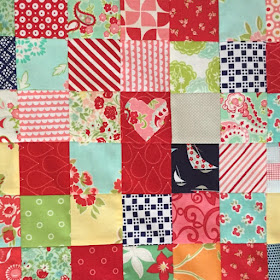
Over the years, I collected and used many, many Bonnie and Camille fabrics. So many that I actually had a scrap bin just for their fabrics. There were bits of jelly rolls, charm packs, and fat quarters. To use up the scraps, I decided to create a postage stamp, scrappy quilt. I really like how this quilt is scrappy yet cohesive because all of the colors go together well.
I cut up all of the scraps into 2 ½" x 2 ½" squares (so they finished in the quilt at 2" x 2"). I used the scraps as leaders/enders (small pieces of fabric placed under the presser foot to start and end chain piecing). The Crafty Quilter has an excellent blog post all about leaders and enders.
I typically press all seams open and pin at every intersection. For speed on this quilt, I pressed all of the seams to the side to nest the seams and did not pin (and my points were surprising pretty decent).
I did have one little oops where two dark red squares were right next to each other. This was bugging me so I appliqued on a little heart onto one of them 💛 (I stitched the heart down while quilting.)
To keep the quilt top organized, I sewed the squares into 4x4 blocks (8 ½" x 8 ½") then sewed the blocks into the quilt top.
QUILTING DESIGN
Whenever the piecing of quilt top has a grid I always try to use that grid in the quilting design. It eliminates the need for marking the quilt and helps keep the design more precise. You can see another grid design in my Board and Batten quilt.
I was considering an orange peel design on another quilt and decided to test it out on this one. For the orange peel quilting design, I simply used my free motion foot and working from the top of the quilt to the bottom, making a curve in the fabric square and trying to pass through the seam intersection.
My orange peels were far from perfect but I think that it works for these bright and busy prints.
I decided that an orange peel was not the way to go for my other quilt. The squares are all solid and the thread is going to blend with some of the squares and have some contrast with other squares. I decided that the orange peel design was going to look too busy and that all of my oops and bobbles while quilting would show up too much for my liking.
I donated this quilt through the Greenville Modern Quilt Guild's charity program.
Quilt details:
Size: 32" x 40"
Pattern: Postage stamp made from 2" (finished) squares
Fabrics: Quilt top - assorted Bonnie and Camille fabrics
Quilting: Orange peel design using cream Aurifil thread in 50wt


Always loved that color combo.
ReplyDeleteGreat idea & all sorts of sizes for the squares could be utilised for different sized quilts. Thank you. Take care & hugs.
ReplyDeleteGreat idea Cheryl and I love using seams to FMQ an orange peel design. Good idea to break it down into 8.5” squares too!
ReplyDeleteWhat a fun way to use up some of your B&C scraps, and I love the way you use the piecing to help guide your quilting plan. I'm sure someone is still using and enjoying this quilt!
ReplyDeleteThank you for the inspiration to use my drawerful of 2.5" squares, and the quilting ideas.
ReplyDeleteThanks Julia!!
DeleteWhat a cute little quilt! And yes, the scraps look very cohesive coming from one designer. I am sure the quilt will be loved lots. xo
ReplyDeleteA very fun finish! It's great that you figure out what worked and what didn't for your other quilt.
ReplyDeleteIt is a lovely bright quilt. Using fabrics by the same designers gives it a very cohesive look. Thanks for all the tips and links - very helpful.
ReplyDelete