Pages

Past Finishes

Monday, August 28, 2017

Cookies and Cream ++ Pattern Release

I am excited to announce that my pattern, Cookie and Cream is now available as a stand along digital quilt pattern in two sizes! You can now find the pattern on Etsy and Craftsy.


The pattern is on sale half off for one week (through Monday September 4th at midnight) for only $5.00. (You can use coupon code TWOPATTERNS for $2 off two patterns or THREEPATTERNS $4 off 3 patterns in my Etsy shop for even more savings.)

Cookies and Cream is a fun and easy fat quarter friendly pattern with blocks that resemble sandwich cookies. All you need is 5 fat quarters and a yard of background fabric to make the baby quilt top!

The cover version of the quilt was made using prints from the Garden Dreamer collection by Maureen Cracknell for Art Gallery Fabrics and a white background from Needle and Foot Fine Fabrics.

For the quilting, some simple outline quilting and a bit of hand quilting finished the quilt.


Many, many thanks to Paige of Quilted Blooms and Yvonne of Quilting Jetgirl for their awesome tech editing and reviewing!!

Just a reminder, you can find Cookies and Cream at Etsy and Craftsy for $5.00 for the next week :)


Thursday, August 24, 2017

Piece and Quilt with Precuts Blog Hop - Morse Code - My Version of Dot 'n' Dash

Christa Watson, a good quilting friend of mine, just launched her 3rd book called Piece and Quilt with Precuts: 11 Quilts, 18 Machine-Quilting Designs, Start-to-Finish Success. (affiliate link)  I love Christa's books in that they take you all the way from fabric selection, through the quilt top making process, and through the quilting process too.  It is a pattern book and a quilting book in one!


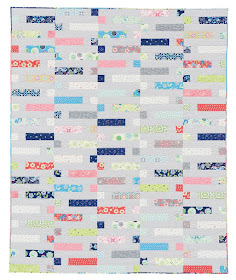
Christa sent me a copy of the book and I chose to remake the Dot 'n' Dash quilt pattern with a little twist in the fabric selection and size.  Here is the book version of Dot 'n' Dash, a lap sized quilt.

Photography courtesy of Martingale/That Patchwork Place

The Dot 'n' Dash pattern is written for jelly rolls (which makes for a very speedy quilt top). I did not have a jelly roll that I wanted to use, but I had this wonderful print from Anna Maria Horner that I did not know what to do with. The print is Crossing Paths from the Lou Lou Thi Needleworks collection and it is a 58" wide quilting cotton with stripes running from selvedge to selvedge with cross-stitch patterns on them.

Instead of cutting the fabric the traditional way (selvedge to selvedge), I cut the Crossing Paths fabric along the length of the fabric so each of my pieces contained different colored stripes.  It gave the look of improv sewing a bunch of fabrics together with much less work.  I actually made the entire quilt (top, binding, and backing) with only this print and some white background fabric! I thought it was a neat touch to have the backing show what the fabric looked like before it was chopped up. 


I changed the number of blocks in the quilt to bring it down to a baby size. I am always needing baby quilts as gifts so it is good to have one finished in case I need one in a hurry.  My version finished at about 40" x 48".


The quilt top came together very quickly and easily and soon it was time to bast and quilt.  I quilted using the continuous stipple design from the book (shown on the Windows quilt in Piece and Quilt with Precuts).  Stippling is one of my favorite quilting designs, it gives great texture and is very quick.  


With so much white, I would have typically gone with a white thread, but to add just a hint of color, I used really light pink Aurifil thread in 50 wt. for the quilting.


I really enjoyed Christa's book, especially how it combined great looking quilt designs, easy to follow instructions, and inspirational quilting designs.  You can pick up a copy of Christa's book over on Amazon by clicking here (affiliate link) or buy a signed copy in Christa's store.

Follow along with the hop - There are multiple quilters showing different versions of each of the book patterns over the course of the hop, you find a listing of all the different posts over on Christa's blog.


Monday, August 21, 2017

Guest Posting at Quilt Theory

I'm over on the Quilt Theory blog today kicking off a series to give readers a little more insight into the Quilt Theory designers.  Yvonne is my first victim interviewee :)  To learn more about Yvonne @ Quilting Jetgirl in my serious (and not so serious) interview, you can click right here.


Friday, August 18, 2017

Taste the Rainbow

I have excited finish to show today, Taste the Rainbow, a modern birds in the air mini quilt is finally all done!


My local modern quilt guild (the Greenville Modern Quilt Guild) announced a challenge in late spring to make a mini quilt (less than 36" on all sides) with a modern take on the classic birds in the air block.

I love the birds in the air block (in fact the quilt design I have published in the 2018 Quilter's Planner is take on the block, you can see it here.)

My mind went towards how to place the blocks without the traditional grid and thought of a circular design.  Combining that with a rainbow palette and I had the beginnings of my quilt design.  The rainbow fabrics are a mixture of fabric manufacturers with the majority of the fabrics being Robert Kaufman Kona Cottons and Michael Miller Cotton Coutures.  The background is a Blueberry Park print from Karen Lewis for Robert Kaufman.

I used Corel Draw to draw out the design and create the paper piecing templates.  In order to keep everything well aligned and spaced, I added a lot of radial lines, you can see the craziness.

In my first iteration of the design, all of the blocks were facing the same direction but as I continued to play with the design, I flipped the blocks so they were alternating facing inside and outside.

Once the design was finalized (at 32 1/2" x 32 1/2"), I created the paper piecing templates.  The circle has 16 slices, each slice contains 4 sections, and each section contains 3-8 pieces of fabric.  Needless to say, this was not a quick quilt to make.


The quilt top finished was finally finished and then it was time to quilt bast and quilt.  Aurifil sent me matching 12 wt threads for each of the triangles.


My first thought was to add little cross-stitch crosses into the triangles but I did not think that looked right.  I then tried french knots, then walking foot quilting, and then free motion quilting.  I was not happy with any of these.  Finally I tried adding some running stitch embroidery (I am calling it embroidery as the stitches only go through the top layer, they are not quilting stitches) and I loved how it looked.  I added running stitches with 1/8" spacing between the lines.  This also took a long time but gave me a nice hand project for when I was outside with the kids.

I quilted the background by echoing the triangle shapes close to the seam lines and then adding some concentric 16 sided polygons.


So here is the finished quilt, I am really happy with how it turned out.  As a bonus, I won first place in the guild challenge!


As I have been sharing sneak peeks of the design I had a number of quilters ask if I could release this quilt as a pattern, I am happy to oblige :)

Taste the Rainbow Templates - Craftsy & Etsy

Note: This is a set of advanced level paper piecing templates, not a full pattern.  The instructions do not contain general paper piecing instructions, sizes of fabric pieces to cut, or seam allowances printed on the template sections.  The mini quilt finishes at 32 1/2" x 32 1/2".

You can find the instructions on sale at both Craftsy and Etsy for only $5 for the next week (ending at midnight on Friday the 25th).  After Friday, the instructions will go up to $7.50.

Thanks for taking a look and thank you to my pattern reviewers Paige @ Quilted Bloooms and Yvonne @ Quilting Jetgirl for all of their time and experience.


Wednesday, August 16, 2017

Quilter's Planner - Sampler Quilt

I have another fun secret sewing project to share today...

You know that I designed a quilt pattern for the 2018 Quilter's Planner from my post last week, this week I get to show you another new feature for the 2018 Quilter's Plannera full sampler quilt pattern that I designed!  You can find out more about the planner and all of the other wonderful new additions here (affiliate link).

When Stephanie approached me about possibly designing a sampler for the Quilter's Planner I said "Yes!" right away.  I love designing quilt alongs and loved the challenge to create a fun and easy paced quilt along with a modern and fresh feel to it (along with an alternative more traditional layout).

The sampler quilt contains instructions for 12 different blocks and two quilt top layouts, a more modern on point version and a more traditional version.  I am planning on sewing along next year to make the on point version with some of my Bonnie and Camille fabrics.

I designed the quilts and wrote the instructions, Susan Bishop (@suebquilts) pieced the quilts and Mandy (@mandaleiquilts, Mandalei Quilts) quilted the quilts.  They both did such a beautiful job!

Here are some pictures of the finished quilts...


Photograph by Kitty Wilkin @nightquilter, taken for The Quilter's Planner 2018 @thequiltersplanner


Photograph by Kitty Wilkin @nightquilter, taken for The Quilter's Planner 2018 @thequiltersplanner


Photograph by Kitty Wilkin @nightquilter, taken for The Quilter's Planner 2018 @thequiltersplanner


Photograph by Kitty Wilkin @nightquilter, taken for The Quilter's Planner 2018 @thequiltersplanner


Photograph by Kitty Wilkin @nightquilter, taken for The Quilter's Planner 2018 @thequiltersplanner

Just remember, you can now pre-order your Quilter's Planner 2018 right here and the bundle right here (and you can learn about all of the other new features and my other pattern I have in the planner in my blog post from last week).

Which is your favorite version - the more modern or traditional?  Are you thinking about joining in?

Tuesday, August 15, 2017

Summer Crush - Mosaic Contest Entries

A couple of days ago, I saw on my Bloglovin feed that Stitched in Color was having a another fabric mosaic contest.  For each mosaic contest, Rachel gives a theme and some inspirational photographs and then you get to go play, creating different fabric bundles from the fabrics at Quilt Sandwich Fabrics. I think that making digital fabric combinations (almost) satisfies my fabric tooth as much as buying actual fabric!

The theme this time was Summer Crush and Rachel pulled together some beautiful inspirational photographs.

To make my bundles, I usually go through all of the shop's fabrics, coping any fabrics that catch my eye and I think might work into PowerPoint.  I usually start with a focus fabric in the center of the mosaic and then play around with the other fabric thumb nail images, arranging them around the center fabric.

For both of my bundles this time I started with Anna Maria Horner prints, their aquas, yellows, and pinks spoke summer to me.

Bundle #1 - Summer Pop


Bundle #2 - Social Summer

 I hope you enjoyed my interpretations of Summer Crush and will hop over to Stitched in Color's blog to see the other gorgeous entries.

Monday, August 14, 2017

OIfa Endurance Review and Giveaway

As August's instructions for the Magnolia Mystery quilt have been for cutting our fabric, I thought it would be very timely for a review of the Olfa Endurance rotary blades and a giveaway!

This giveaway came about because Olfa commented on an older post of mine on Instagram where I had a bunch of HSTs and an Olfa cutter in the picture.  I replied to their comment that I love my Olfa cutter and that I have tried so many different types and brands of cutters and it is the only one I use.  They asked if I had tried their Endurance rotary blades and when I told them I had not, they offered to send me one to try and if I liked it they offered to sponsor a giveaway so you could have a chance to try one too! (So long story short, this giveaway is sponsored by Olfa but all opinions are 100% mine.)


I was wondering if I would be able to really tell if my blade stayed sharper longer, but after cutting all of the fabrics for three complete quilts I can say that I really could tell a difference.  The blade was still sharp after all of that cutting.


In addition, Olfa also sent me a folding cutting mat.  This is going to be perfect to bring to classes or retreats and when unfolded is a very usable 12" x 17" size.


You can find the Olfa Endurance blades and mat on Amazon or your local quilt shop. (affiliate links)

Would you like a chance to win an Olfa Endurance rotary blade and folding mat?  There will be two winners, each winning a blade and mat.  Due to shipping costs, this giveaway is limited to only the US and the prizes will be shipped directly from Olfa.

To enter, simply use the rafflecopter: (if you are reading this post via e-mail, you may need to click over to the blog for the rafflecopter box to appear below).

(If you do not have an Instagram account, you can type in "no IG" into the box for an entry)

a Rafflecopter giveaway


Friday, August 11, 2017

Diamonds in the Sky ++ Pattern Release

I am excited to announce that my pattern, Diamonds in the Sky is now available as a stand along digital quilt pattern in three sizes! 

You can now find the pattern in my pattern shop in both digital and print versions.


Diamonds in the Sky is a fully paper pieced quilt pattern and was originally published in the Winter 2016 issue of Modern Quilts Unlimited magazine with instructions for a lap sized quilt.  The stand alone pattern now contains baby, lap, and large lap sizes.


Diamonds in the Sky is a very geometric, paper pieced pattern with a diamond pattern that emerges as the quilt top is assembled.

This quilt is an advanced beginner to intermediate level pattern and assumes basic paper piecing skills. Detailed instructions for paper piecing may be found on many blogs and YouTube.  The cover version of the quilt was made from Kona Cotton Solids and Science Fair, both collections by Robert Kaufman.


Many, many thanks to Paige of Quilted Blooms and Yvonne of Quilting Jetgirl for their awesome tech editing and reviewing!!


Just a reminder, you can find Diamonds in the Sky in my pattern shop in both digital and print versions.


Wednesday, August 9, 2017

Flock of Geese Quilt and Quilter's Planner 2018

As you probably have seen around the internet and social media, the Quilter's Planner 2018 (affiliate link), is now available for pre-order!


I have been involved since the first planner (back in 2016) and have enjoyed seeing it grow and improve each year.  New this year:


  1. Shipping costs will be included in the pricing.
  2. The planner will include 4 pages of stickers!
  3. Quilt patterns will be in a separate magazine.

Speaking of patterns, I actually have two contributions to the Quilter's Planner this year; a quilt pattern called Flock of Geese and a monthly sampler quilt pattern (I will be posting about the sampler quilt next week).

Flock of Geese is a modern take on the traditional Birds in the Air quilt block.  I had an idea for a teal, green, blue, and yellow color palette and started pulling fabric options from my stash.  


I assembled the quilt top with the blocks on-point, giving a different look to the traditional Birds in the Air design.  I quilted Flock of Geese with randomly spaced diagonal lines to form a cross-hatch pattern using Aurifil 50 wt in white (color 2024). The diagonal lines are in a variety of spaciongs from about 3/8" to 1".  I like the texture the quilting gives, but I must admit that it was very time consuming.

Photograph by Kitty Wilkin @nightquilter, taken for The Quilter's Planner 2018 @thequiltersplanner


 Photograph by Kitty Wilkin @nightquilter, taken for The Quilter's Planner 2018 @thequiltersplanner

Photograph by Kitty Wilkin @nightquilter, taken for The Quilter's Planner 2018 @thequiltersplanner

I use my 2017 planner to schedule my blog posts, organize my to-do lists, and manage my work, home, and quilting calendar. It really is an indispensable tool for managing my life (and pretty stylish too)!

The Quilter’s Planner (8″ x 10″) features:

  • 8″ x 10″ planner, 240 pages
  • Weekly and monthly calendar pages
  • Project planning pages and project at-a-glance pages
  • 12 monthly blocks featured in a new Quilter’s Planner Sampler Quilt pattern by Cheryl Brickey NEW!
  • A companion full-color glossy magazine with 13 quilting and sewing patterns by top designers NEW!
  • 4 pages of planner stickers by 2018 Featured Artist Alison Glass  NEW!
  • Laminated cover and colorful tabs designed by Alison Glass  NEW!
  • 15 coloring pages designed by Alison Glass  NEW!
  • To-do lists galore
  • Photography of the 14 included patterns by Kitty Wilkin
  • Deadline planning pages
  • Bee block & swap projects planner
  • Yearly goals planning Page
  • In-depth reference section with cutting measurements and yardage planner
  • Fabric chart from Andover Fabrics featuring Alison Glass fabrics  NEW!
  • Measurement chart for personal garment sewing  NEW!
  • Lots of graph paper and blank drawing paper
  • Pocket on the inside back cover

QP Mini (5″ x 7″) features:

  • Small 5″ x 7″ 80-page book that fits nicely in your bag
  • Undated daily planning pages with to-do lists, appointments and shopping lists is the perfect companion to the full-sized Quilter’s Planner
  • Meal planning and grocery lists to take on-the-go  NEW!!
  • Graph paper and blank pages for sketching or jotting down notes
  • Projects-at-a-glance pages so you can keep your full list of ongoing projects with you
  • Project planning pages so you can easily keep notes on your project and what you need to buy, to bring with you to the quilt shop


For U.S. pre-orders, you can pre-order the 2018 Quilter’s Planner or 2018 Quilter’s Planner bundle now! If you are an international reader, the Fat Quarter Shop has pre-orders with international shipping.

I'm linking up with Lorna @ Sew Fresh Quilts linky party Let's Bee Social:
Sew Fresh Quilts


Thursday, August 3, 2017

Magnolia Mystery Quilt ++ Cutting Instructions


Welcome to the August Instructions for the Magnolia Mystery Quilt, we will be cutting a majority of our fabric this month! We are just getting started so please join us!

You can find the fabric requirements and some helpful fabric picking tips right here (and all of the Magnolia Mystery Quilt information and posts can be found here).

Now that the Magnolia Mystery Quilt Along has been completed, you can get the instructions as part of the instruction blog posts or you can go to Etsy for a full set of easy to print pdf instructions for sale:

The Magnolia Mystery Quilt contains instructions for both Lap and Queen sizes which are both included in this post:


Lap Size Cutting Instructions


If you like to oversize and then trim down your half square triangles (HSTs), then oversize the pieces indicated with a * by about ¼”.

1. Cut 3 strips* 3" x WOF.
     a. Sub-cut the strips into 36 squares* 3” x 3” (each strip can yield 13 squares).


If starting with yardage...
1. Cut 9 strips 2 ½" x WOF.
     a. Sub-cut the strips into 72 rectangles 2 ½” x 4 ½” (each strip can yield 8 rectangles).

If starting with layer cake slices (10” x 10”) or a jelly roll strips (2 ½” x WOF)...
1. Cut 7 of the slices/strips each into 8 rectangles 2 ½” x 4 ½”.
2. Cut 4 of the slices/strips each into 4 rectangles 2 ½” x 4 ½”.

Keep all matching pieces from each slice/strip grouped together within the fabric pile.


1. Cut 6 strips 2 ½” x WOF.
     a. Sub-cut the strips into 91 squares 2 ½” x 2 ½” (each strip can yield 16 squares).


1. Cut 3 strips* 3” x WOF.
     a. Sub-cut the strips into 36 squares* 3” x 3” (each strip can yield 13 squares).
2. Cut 13 strips 2 ½" x WOF.
     a. Sub-cut 6 strips into 36 rectangles 2 ½” x 6 ½” (each strip can yield 6 rectangles).
     b. Sub-cut 7 strips into 112 squares 2 ½” x 2 ½” (each strip can yield 16 squares).

The majority of Fabric D will be left uncut for now, the remainder will be cut in a future month.


Queen Size Cutting Instructions


If you like to oversize and then trim down your half square triangles (HSTs), then oversize the pieces indicated with a * by about 1/4”.


1. Cut 4 strips* 4" x WOF.
     a.   Sub-cut the strips into 36 squares* 4” x 4” (each strip can yield 10 squares).


If starting with yardage...
1. Cut 12 strips 3 ½" x WOF.
     a.   Sub-cut the strips into 72 rectangles 3 ½” x 6 ½” (each strip can yield 6 rectangles).

If starting with fat quarters (18” x 20”)...
1. Cut 7 of the fat quarters each into 8 rectangles 3 ½” x 6 ½”.
2. Cut 4 of the fat quarters each into 4 rectangles 3 ½” x 6 ½”.

Keep all matching pieces from each fat quarter grouped together within the fabric pile.


1. Cut 9 strips 3 ½” x WOF.
     a.   Sub-cut the strips into 91 squares 3 ½” x 3 ½” (each strip can yield 11 squares).


1. Cut 4 strips* 4” x WOF.
     a.   Sub-cut the strips into 36 squares* 4” x 4” (each strip can yield 10 squares).
2. Cut 20 strips 3 ½" x WOF.
     a. Sub-cut 9 strips into 36 rectangles 3 ½” x 9 ½” (each strip can yield 4 rectangles).
     b. Sub-cut 11 strips into 112 squares 3 ½” x 3 ½” (each strip can yield 11 squares).

The majority of Fabric D will be left uncut for now, the remainder will be cut in a future month.